MIL-PRF-19500/182H
Dimensions
Ltr
Notes
Inches
Millimeters
Min
Max
Min
Max
CD
.178
.195
4.52
4.95
CH
.170
.210
4.32
5.33
HD
.209
.230
5.31
5.84
LC
.100 TP
2.54 TP
5
LD
.021
0.53
3, 8
LL
.500
12.70
8, 9
LU
.016
.019
0.41
0.48
3, 8, 9
.050
1.27
9
L1
.250
6.35
9
L2
P
.100
2.54
Q
.030
0.76
4
TL
.028
.048
0.71
1.22
7
TW
.036
.046
0.91
1.17
r
.010
0.25
45� TP
45� TP
α
NOTES:
1. Dimensions are in inches.
2. Millimeters equivalents are given for general information only.
3. Measured in the zone beyond .250 inch (6.35 mm) from the seating plane.
4. Details of outline in this zone are optional.
5. When measured in a gauging plane .054 +.001 -.000 inch (1.37 +0.03 -0.00 mm) below the seating plane of
the transistor, maximum diameter leads shall be within .007 inch (0.18 mm) of their true location relative to a
maximum width tab. Smaller diameter leads shall fall within the outline of the maximum diameter lead
tolerance.
6. The collector shall be internally connected to the case.
7. Measured from the maximum diameter of the actual device.
8. All three leads.
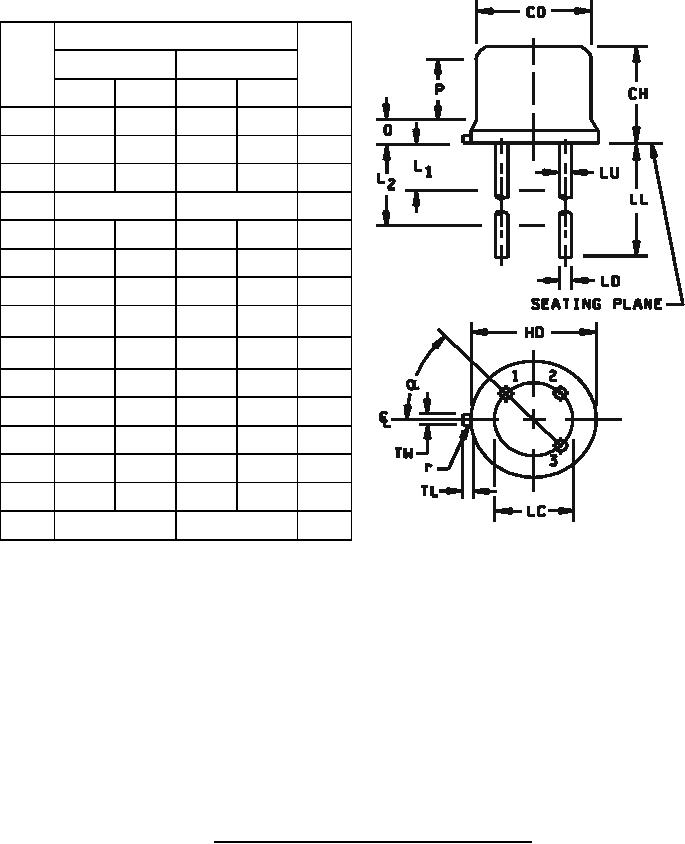
9. Symbol LU applies between L1 and L2. Dimension LD applies between L2 and LL minimum. Lead diameter
shall not exceed .042 inch (1.07 mm) within L1 and beyond LL minimum.
10. Lead 1 = emitter, lead 2 = base, lead 3 = collector.
11. In accordance with ASME Y14.5M, diameters are equivalent to φx symbology.
FIGURE 1. Physical dimensions for device type 2N720A (TO-18).
3
For Parts Inquires call Parts Hangar, Inc (727) 493-0744
© Copyright 2015 Integrated Publishing, Inc.
A Service Disabled Veteran Owned Small Business